In Association With "The Pursuit of Glory"

In Association With "The Pursuit of Glory"

Thursday, May 24, 2012

Finally! Successful (whole wheat) Bread!

For the past 5 or so weeks I have been making my own bread. Usually it is pretty easy (with a bread maker). But when you only do 100% Whole Wheat and ditch the eggs and milk/dried milk, things can get fairly difficult. The bread still will taste good, but it's seemingly undercooked, overhydrated, too thick, and doesn't cut well. And, to top it off, a whole loaf is a mere 8 slices rather than 12+. The dense bread is nice but only sometimes - such as a one piece toast breakfast before a bike ride. But if you make a sandwich with that heavy of bread, it is a meal and a half. So after many, many loaves I finally made a loaf that rose perfectly and still tastes excellent.

Fluffy, Yummy, but not too Light. Just Right.
Here's the recipe - in order of typical placement into bread maker tray:

1 C Almond Milk
2/3 C Water (no specific temp)
2 T Smart Balance (Butter substitute)
2 T Agave Nectar
2 tsp Sea Salt
3 3/4 C Whole Wheat Flour
1 packet (2 1/4 tsp) Active Dry Yeast

*To top it off with some added texture and flavor: (I highly suggest this step)
1/2 C Rolled Oats
1/4 C Sunflower Seeds

Put all ingredients in bread maker and choose correct setting ("Whole Grain/Sweet Bread" for mine!). Mix up ingredients just to be safe - see below. Set it, go for a 3.5 hour bike ride, then come home to wonderful fresh bread! Scratch waiting to cut it...that's far overrated. Although, honestly letting it sit for an hour does help overall. Nevertheless, I always cut off the top end and throw some MNB: Glorious Almond Butter on top of it.

I have had mixed results on my bread maker's ability to evenly mix the ingredients...thus, in order to assure everything is mixed, I pre-mix it with a fork until the dough has been somewhat mixed. Then I lick the fork and enjoy the flavor that is the bread even before it is cooked!

So in the rush of putting everything together, running some errands, then a long bike ride...I didn't take any pictures during the process! However, I have a couple after photos of the glory that remains.

Pretty great crust texture. A little crispier would be nice for me, but I think the masses will like how this turned out.


Sunday, May 20, 2012

Glorious Almond Butters

This recipe is so delicious I want to keep it to myself. But it's way too simple to be anything near unique. Thus, I unleash upon you the best almond butter I have ever had.


Literally. It's insane. And it's far too easy.

And I got experimentive (not even a word, but it's completely applicable) and just thought "what would taste awesome?". This is pretty much what I continually think to myself. Whether I'm at a new restaurant, out biking, hungry, full, bored...

So I came up with Cinnamon Raisin Almond Butter.


But first: Sea Salt Almond Butter (sea salt is such a small addition, but it works absolute wonders. I was amazed)

Glory is just 10,000 revolutions of the blade away! So hit ON!
For just about 1C Almond Butter which equals 8x2Tbsp servings
2C Almonds (I suggest 4 Cups :) it'll make about 2C butter)
1-1.25tsp Sea Salt (I initially stated 1.5tsp - but I think that might be a little too potent for some. Start with 1tsp and g from there!)

Roast evenly spread Almonds on cookie sheet for 15mins @ 350F. Shift them around at least twice during the 15mins. Some of the almonds should slightly crack and change color a little. Once done, set aside to cool for 5-15mins depending on how anxious you are. Put in food processor and run 'em til they're smooth and slightly runny. When I first made my own butters, I got complacent at a "thick" consistency. Keep going. If it builds up on the sides. When you think it's all done, mix for another 3 minutes! Taste it, if you like saltier add some. But this recipe is a really well balanced amount...more and you will lose some of the almond taste...less and you aren't quite at the optimum.
Almost there. Scrape the sides and mix til the butter is warm from friction.
Now for the better stuff. Like better than Lipton "best stuff on earth" bogusness.

I once again suggest the more is more approach (similar to cycling training).

But here's the yield for ~1C.
2C Almonds
3-5Tbsp Raisins (Start w/ 3-4T, add more if the butter can take it and still be a good texture!)
2tsp Cinnamon (This is a good amount, you can add more - but taste it before you do...)

The result is absolutely glorious. It's cinna-money. If your raisins are really dry they could clump up the resulting butter. So, for dry raisins I suggest measuring your tablespoon, dripping water over it, then press them by hand to push out the water. This will give the raisins enough moisture, but will not make the almond butter runny. Too much water and you could get the oil/water separation...and you do not want that in this (or any!) almond butter.

This is 4C Almonds. Makes an overflowing 2C Almond butter here. And there's enough left in the FP to swipe up with your finger or some bread or to put on celery. Possibilites = endless.

Saturday, May 12, 2012

Pizza: Thirve Style.

So, this one didn't turn out great. I'm hoping a better baking method will aid in making the texture turn out as good as the flavor. If you expect the dough-y-ness of a greasy, typical pizza you will be disappointed. This dough is made from beans and some flour. It's not supposed to be like typical pizza dough. No yeast, baking powder, or baking soda involved.

This recipe is taken pretty much from the book "Thrive", which is an awesome resource for healthful recipes that are delicious. This one in particular is the "Spicy Black Eyed Pea Pizza". I took some liberties with the original recipe. It consists of a garlicy and slightly spicy crust, a tomato-based sauce, and whatever toppings you could imagine adding! I made a double batch last - testing to see how the dough does after being frozen (I will be sure to let you know next week sometime). I'll be cooking it up tomorrow night for dinner!

Ingredients listed is for a single batch.

Crust/Dough:
1C Black-Eyed Peas
1C Cooked Quinoa
2 Cloves Garlic
1/2C Brown Rice Flour
3T Coconut Oil
1t Crushed Red Pepper
1t Black Pepper
A couple dashes of Crushed Chipotle Pepper (or use cayanne, etc)
~1t Sea Salt
1/4 to 1/2 C water

Combine all ingredients except water! Process in food processor until it forms into a ball. If it seems to not be forming/needs moisture, add water 1/4C at a time until it forms into a dough ball. Be patient, this takes a while...don't put in too much water or else your dough will be mush...and that would be bad news. PS: Taste the dough. It's delicious. I'm thinking if I can experiment this will make excellent pita bread!

Sauce:
1/2 Can (~1C) Diced Tomatoes
1 Clove Garlic (notice a trend here?)
1/2 medium-large Cucumber (probably ~3/4 Cup)
2T Olive Oil
1.5T Balsamic Vinegar
1 Roasted Red Pepper
5-10 Small Leaves of Basil (depending on preference)
1t Oregano
1t Rosemary
1t Crushed Red Pepper

Combine all ingredients in a food processor until evenly spread (takes about 2 seconds).

Toppings:
3 Medium Carrots, Sliced thin
1/2 Onion: I used yellow and sliced 1/4 thin, and 1/4 into "chunks" - the medley of textures/flavor distribution is quite nice
1 Green Pepper
1/2 Sweet Potato (microwaved for ~2min) sliced into very thin circles
Add spices/additional (hot) sauce as desired

I didn't take any pictures of the processing of the sauce or the dough. I wanted to get it done before heading to bed so I could make dinner super quick tonight!

Pre-Baking.
Cooking Instructions (which I did not): Preheat oven to 300. Lay dough flat on pre-sprayed 10"x15" pan 1/4" thick (or greased w/ coconut oil). Add sauce, then toppings. Bake for 40-45mins.

I cooked it quickly at a higher temp. The dough did not turn out well, sadly. But I think it would be wise to put the dough in for 15-20min, add the sauce for 5-10min, then put toppings on until it is finished baking.

The way I did it flavor was good, texture was pretty bad. But it looks pretty darn tasty.

Next time the crust will be prime!

Thursday, April 12, 2012

Perfectly Tuned Texture Granola Bars.

I had no idea how this was going to turn out when I first decided to go ahead with it. I looked at 10+ different recipes for granola bars today and couldn't find something that fully satisfied me. Thus (as usual here at the Mid-Night Baker), I went totally off course and pull ideas from 5 or 6 recipes - some baked some unbaked - and just went for it. What was the result?

Surprisingly well stuck together, baked, delectable granola bars. I present to you my first baked granola bar experiment: Honey Almond Granola Bars.

Sources: About 5 different recipes and my knack for not liking the act of following recipes
  • 1.5 cups (160g) quick cooking oats (I was basically out of thick-cut rolled oats, but the quick oats worked well!)
  • ⅔ Cups (75g or 2.5 servings) Almonds
  • ⅔ Cups (100g or 2.5 servings) Raisins
  • ½ Cup (58g) Grape Nuts
  • 5Tbsp (105g) Honey
  • 5Tbsp (75g) Almond Butter
  • 2T-4T water
  • 1/2tsp Vanilla Extract
  • Dusting of Baking Soda (not sure if this actually did anything)
Turn oven on to 350F. Mix together all dry ingredients in a bowl until well distributed. Heat honey in sauce pan until it begins to boil. Add almond butter, vanilla, and water then mix until smooth. Add the sauce to the dry ingredients SLOWLY to ensure very even distribution. If you feel you need more binder, then heat up more honey/almond butter (or go with 2T ground flaxseed + 4T warm water) and add it to the mixture. Spray an 8x8 Pyrex with non-stick, pour in and flatten contents of bowl. Bake for 15-20mins until brown and the scent starts to be noticeable upon opening oven - I didn't time this, I just went by feel as usual...it's pretty clear when it's ready. Cool granola bars and then cut into 8, 12, or 16 bars. I did 16 bars for 2x2" bars. Partly because with the amount of almonds in them the calories can be high as a quick snack, but larger bars would be pretty substantial for athletic activity or for a holdover between meals.


These will likely be a snack of mine ~1 hour before Battenkill this weekend. Gotta give them a true test!

Perfect Texture. Already approved by triathlon coaches and foodies. One coach stated "When are you going to start a cookbook?" Hmmm...we shall see!
And, as usual, for the nutrition!


They turned out pretty well! I had one for dessert last night. Only things I would change to the recipe is to maybe cut down on the almond butter/honey and go with some of the flaxseed binder method to both cut some sugar and add some more distributed fats. I will definitely get more creative with mix-ins but was limited as my cabinet is rather empty right now :(...very sad, I know.

Thursday, March 29, 2012

E=MC^2 Bars (Double Batching NRG Bars!)

I haven't strayed too much from the Energy (NRG) Bar recipes in the book Thrive by Brendan Brazier, but today I stepped out of the box on the second set of NRG bars. They're very good, very calorie efficient, taste great, and are perfect for pre-activity or general on the go usage. Only thing I can complain about...it'll turn to mush if you put it into a bag in your cycling jersey. Thus, usage for during activity is limited to activities during which you take breaks. I am working on devising an NRG Bar for during race/activity use. It will be the natural, homemade equivalent of what many people use as CLIF Bars and PowerBars. It will likely require a baking procedure, which I don't mind...but I'm going to strive for a raw version as well - as many athletes like the immediate digestibility and unadulterated touch of raw food. I may just go with the "NRG Ball" and ball-up these bars with added Honey/Agave to complete the ball...

So, back to today's kitchen FRENZY. I had the day off from work and (more impressively) took the day off from my bike. Surprise, surprise! After a complete half year of not missing a single day of cardio activity - despite my Dad's hospital stay and my broken collarbone and life - I deemed (with extensive persuasion from my teammates and 'coach') a day out of the saddle would help and not hurt.

Thus, I had A LOT of excess energy to burn and I took it out in the form of food...my second favorite thing to cycling. Here's the list:
  1. Sweet Potato Caribbean Kale Soup
  2. Whole Wheat Bread (my first bread making ever!)
  3. Carob Blueberry NRG Bars
  4. Apple Cinnamon NRG Bars
Note: Both NRG Bars adapted from Thrive.

Since today's focus is NRG Bars you'll be getting two (yes, 2!) recipes :)

First up were the ones I absolutely 100% love: Carob Blueberry NRG Bars:


NRG Slabs! About to become the glorious "NRG Bars"
(Left: Carob-BB, Right: Apple-Cinn)
NRG Bars:
Carob Blueberry:
  • ¼ C Almonds (32g)
  • 1 C (10 avg sized) Medjool Dates (131g)
  • ¼ C (30g) Coarsely Ground Flaxseed – but any Flaxseed shall work
  • ¼ C (34g) UNHULLED Sesame Seeds – nutritional content is absurdly better in unhulled!
  • ¼ C (30g) Carob Powder
Add-ins:
  • 1 C (200g) Cooked Buckwheat – comes from about 1/3 cup dry (when cooked with H2O 2:1). Also, I cook A LOT of Buckwheat at once and store it in the fridge because I make these/use buckwheat so often – freshly cooked buckwheat yields a bit gooey-er of bars.
  • ½ C (74g) Blueberries
Put all except buckwheat/blueberries into the food processor (FP) and blend until smooth/clumpy. If it gets too thick, add water 1T at a time. Then add Add-ins…you can either ‘pulse’ or (better, but a pain!) hand mix them into the blended goodness.

Flatten to approx ¼ inch onto a cutting board – mine came out to be close to 8x8 inches. I prefer to put it in the fridge for 30+ minutes so it firms up a bit, which eases the cutting and storing process. Cut in 8 bars (each is 3.5”x2”) and put into tupperware, separate levels of bars with wax paper.

Apple Cinnamon:
  • 1 Large (242g) Apple – I had Fiji on hand. By large I mean the thing weighs 242g, a half-pound
  • ⅓ C (48g) Popped Amaranth – A really cool grain that pops like popcorn (see below for resources on how this cool, but easy process works!)
  • 1 C (~20) Mariani Pitted Dates (140g) – tested these instead of Medjool. In order to get the thickness that Medjool’s have I measured the cup, filled it with water and set it aside while adding other ingredients. Before adding them to the FP I drained the water. This will ensure that your bars are not ‘dusty’ but stay together well!
  • ¼ C (30g) Hemp Protein
  • ¼ C (32g) Cashews
  • 1T Cinnamon
  • 1.5 tsp Nutmeg
Add-ins:
  • ½ C (50g) Rolled Oats (thicker = better!) 
Follow same directions as listed above. These ones came out a bit mushy. I would suggest using a not-so-dry grain like Amaranth/Oats. The original recipe calls for Quinoa (I didn’t have any readily available) and I think that would hold a touch better…but the apple is a pretty runny fruit when hit with the FP, so who knows?


Amaranth "Reading" (actually "video") Materials...reading just sounds more official and studious. I'm still wondering why I wrote "Reading" haha: http://www.youtube.com/watch?v=sqbQDKxDyW4

Now for the nutrition: 8 bars per recipe.


 And now for the Candy of the Eye:


NRG Bars, tucked away for tomorrow. And Saturday. And Sunday...
(Yes, those are three full layers of bars)

The flavors of both are excellent. Carob BB's turned out better than ever - not so chocolatey that they seem dessert-like so they're good for activity. Apple Cinnamon are very good, I wouldn't suggest using too much more cinnamon/nutmeg than I did (I like the spice-filled flavor, so I doubled/tripled the original recipe quantities).

Wednesday, March 28, 2012

Hazelnut Cocoa Butter: Rendering Nutella Useless Since 2012 (3/27/2012)

WHAT?! Render Nutella useless!? Absurd, right? Until you try making this. Okay, Nutella will forever win in the sugary sweet category. But Nutella is made from "primarily" Hazelnuts (nope - more on this shortly). Funny story, I couldn't find "Hazelnuts" in bulk at Whole Foods! I was freaking out wondering if I was crazy or stupid...or if WF failed miserably. Thank goodness for none of the above: I will settle on "Uneducated", as hazelnuts are also known as "Filberts" (which is an awesome name, or so I think). Does Nutella really taste like filberts? Not really, but it is freakin' delicious! So why change it, you ask. To make it taste pure, delicious, and even better...that's why.

Check out this low-calorie, better tasting Hazelnut Cocoa Butter on a slice of toasted When Pigs Fly Bakery's Maple Walnut Banana loaf . Make it and drop to your knees because the flavorful awesomeness.

I spent much time searching around the interwebs to find a viable recipe. I'm pretty picky and excessively critical when it comes to Nutella. I saw a few interesting ones, that had minimal cocoa and were thus more "Hazelnut Butter" than a Nutella replacement. (Note: Hazelnut butter tastes really good. But the flavor is not quite as potent as what you get from Homemade Almond Butter or Peanut Butter)

Thanks to a friend, Erin, I came across a blog post called 'Better Than Nutella'. I liked it for the most part, but definitely intuitively knew I was going to make some alterations - I pretty much always make alterations. Recipes only do so more for me, I like being creative. Being creative is not only more fun and eye-opening, but it produces a unique result that you have a deeper understanding for and can more readily improve upon! I wanted less added stuff (agave, almond milk, vanilla, etc) and more pure Filberty flavor.


Also, this recipe is vegan and I didn't go into it intending to make it vegan. Next time I may experiment in a smaller batch using carbo powder vs. cocoa to see how things turn out...but it was so good I may just not change it.

Here's my variation:
  • 2 Cups Hazelnuts (Filberts!) ~270g
  • ¼ Cup Agave Nectar
  • ¼ Cup Cocoa (Hershey's 100% Special Dark)
  • ⅜ Almond Milk (Almond Breeze Original Unsweetened)
  • 1Tbsp Vanilla Extract
  • ¼ tsp Sea Salt
    • Notes to alter on my next rodeo: I would say reduce Vanilla to 1/2Tbsp and increase agave if you want it sweeter (I loved mine just as it was, but the Vanilla gave it a little tinge of alcohol. Also, I could try adding more Almond Milk to increase volume/reduce Cal per serving and decrease the vanilla intensity at the same time). Otherwise this was amazing and pure.
Directions: Bake Hazelnuts in oven on 350° for 10-12mins (until they are softened and somewhat roasted and their aroma fills the kitchen upon opening the oven). Rub them in a paper towel to remove the skins - I left about 20% of skins on for lack of wanting to spend 20mins rubbing Filberts (I have a feeling if you don't want too many skins on because they'll taste burnt).
Put Hazelnuts in food processor, blend until if makes butter - scraping the sides when the crumbles build up. Add all other ingredients and briefly mix with a spoon so the powder doesn't explode....and you get a little taste too :). Then, gobble it up...or bottle it before you eat it all!

Picture time!!

Peeled Hazelnuts ready to become.......
Hazelnut Butter (which is quite good completely on its own - try it before you  add any ingredients!)
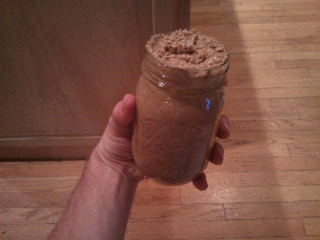
Now, simply render Nutella useless and taste the glory!
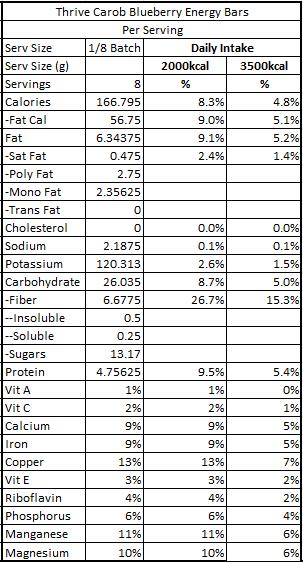
For me this made just over 2 Cups (2.25 Cups to be exact) or 18 servings of 2Tbsp! Now for the crazy part, the nutrition facts on this baby! 2Tbsp yields 110Cal, 84 Fat Cal, and 4.1g sugar...while Nutella has 200Cal, 99 Fat Cal, and 20g sugar. That is a LOT of added sugar.

Not to rip on Nutella...but after looking at the ingredients and their website I will be going on a brief rant.

Nutella's ingredientsSUGAR, PALM OIL, HAZELNUTS, COCOA, SKIM MILK, REDUCED MINERALS WHEY (MILK), LECITHIN AS EMULSIFIER (SOY), VANILLIN: AN ARTIFICIAL FLAVOR.


Can Nutella's Website States:
"Over 50 Hazelnuts per 13 oz. Jar
           Contains No Artificial Colors
           Contains No Artificial Preservatives"
  • But it does Contain Artificial Flavors - the most important part of being gloriously flavorful!

Can you read that three times over!? Sugar, Palm Oil...THEN Hazelnets, artificial flavors and processed whey? And it's not vegan for all those vegans out there :(. You've gotta be kidding me. And 50 Hazelnuts in a 13oz jar...hmmm...my "Nutella" - I actually refuse to call it Nutella - thus, my "Hazelnut Cocoa Butter" has nearly 200 Hazelnuts in an 18oz jar (which would be about 140 Hazelnuts). Thus, I win.

Now check out mine (I win...again):

Saturday, March 24, 2012

The Weekend of the GEL!

Today is a great morning in the Kroot Household (AKA BK Lounge South). I'm making my recovery smoothie for post-ride, dogs are excited to be fed before 5AM, Jason is getting his stuff together as he drives down to Boston to go for a long run, as in 20+ miles! Whenever the kitchen is teeming, I am a happy camper...whenever it is because of workouts I'm ecstatic! He's meeting his Dana Farber Cancer Institute Training Team for a long run on the glorious Boston Marathon course as he participates in support of the Leukemia & Lymphoma Society. Guess what? You should donate! More on Jason in another post that deserves much more focus. Here's his page link: http://www.rundfmc.org/faf/donorReg/donorPledge.asp?ievent=484862&supid=253151052. He's well over $3,000 and on his way to a massive $6,000 fundraising goal.


Back to the Gels, those gooey, weird energy things that get all the hype. Yes they are great and yes they are one of the best ways to fuel while exercising. But what is in a Gel?


Example #1:
GU Tri-Berry: Maltodextrin (Glucose Polymers), Filtered Water, Fructose, GU Amino Acid Blend (Leucine, Valine, Isoleucine, Histidine), Natural And Artificial Berry Flavor, Potassium And Sodium Citrate, GU Antioxidant Blend (Natural Vitamin E And Vitamin C), Calcium Carbonate, Fumaric Acid, Sea Salt, Sodium Benzoate, Potassium Sorbate, GU Herbal Blend [Chamomile, Cola Nut (Has Caffeine), Ginger], Citric Acid, Pectin. Gluten-free. Dairy-free. With ~20mg of caffeine.


Example #2: 
PowerGel Chocolate: C2 MAX CARBOHYDRATE BLEND (MALTODEXTRIN, FRUCTOSE), WATER, CHOCOLATE, GLYCERIN, POWERBAR ELECTROLYTE BLEND (SODIUM CHLORIDE, SODIUM CITRATE, POTASSIUM CHLORIDE), NATURAL FLAVOR, SODIUM BISULFATE, GREEN TEA EXTRACT AND CAFFEINE FROM TEA, SODIUM BENZOATE AND POTASSIUM SORBATE (TO MAINTAIN FRESHNESS). MADE ON EQUIPMENT THAT ALSO PROCESSES MILK AND SOY.

Example #3:
Hammer Gel Apple-Cinnamon: Maltodextrin, Filtered Water, Apple Juice Concentrate, Energy Smart® (Fruit Juice, Natural Grain Dextrins), Ground Cinnamon, Malic Acid, Vanilla Extract, Potassium Sorbate (as a preservative), Salt, Amino Acids (L-Leucine, L-Alanine, L-Valine, L-Isoleucine), Potassium Chloride. This product is processed in a facility that also processes Dairy & Soy products.


A quick example of one of my many Gel Recipies: Agave Nectar, Banana, Almond Butter (homemade), Medjool Dates, Carob (or Cocoa) Powder, Sea Salt.


So, what do I think of commercial gels? I think they have completely transformed the during exercise nutrition scene. I remember back 15+ years ago when we would take GU with us on days skiing where we weren't sure when we would get to (read: want to) stop for a food break. Sometimes you just want to GO...we had GU. This was in the mid-90's when I'm not even sure the athletic world was super keen on this stuff. So what's the big deal? Most of you know - during exercise nutrition has a cornucopia of benefits: increased performance, increased recovery, mental sharpness, energy stabilization, endurance, the list does not stop. Refueling fluids, electrolytes, and energy (mainly carbs and fat) are absolutely critical in performance and the benefit becomes increased with increased duration/intensity.


More recently though - I have become more keen on knowing what I put into my body. I have adopted the, as my late teacher "Bud" Flaherty used to say, KISS method (Keep It Simple, Stupid). Simple means many things: you can actually pronounce the ingredients, the body takes it very well, it is easily disgestible, and it provides very efficient energy. Sure it might not maximize the complex:simple carbohydrate ratio, or have a slight amount of fat (give me a couple months and I'll freakin' nail it!). But it tastes better, feels better, and fuels better.


Books have been and are written on how much and what to intake during exercise. So I will not be going into Glycemic Index (GI), complex carbs, branced chain amino acids (BCAA's) medium chain trigylcerides, protein utilization on longer activities, etc. At least not on this post. Maybe if I bust out a biochem book and a 100% science focus sports nutrition book next to each other. However, consuming nutrition during exercise is very much based on the individual and there is no "golden" number out there. Mainly because it is all about being able to tolerate what you eat. Fats and Proteins are more difficult to digest, and there is much debate regarding simple vs complex carbohydrates. For simplicity's sake (at the moment) I will stick with carbs are easy, fats can be okay, and protein should be avoided in large quantities. This avoidance of high protein is primarily because protein is used to build muscle and not fuel it...when you burn protein for fuel the byproduct has toxins. So if you eat "protein bars" during endurance and serious cardiovascular workouts, I highly suggest you switch it up! A little protein is good - because on longer bouts of exercise your body actually requires a very small amount of protein (or it steals it from your muscles), but take in a lot and you're hurting yourself.


Back to tolerance of digestion: most during exercise nutrition is carbohydrate based, some sources for longer activity (2-3 hours and longer) utilize fat and small amounts of protein - with good reason. Hammer Nutrition recommends ~250kcal per hour (kcal = 1000 calories = 1 Calorie - which is what you see on nutrition labels here in the US). I suggest starting with 200kcal/hr and increase as tolerable. Running is more difficult than cycling as it is not as easy to carry/eat nutrition and you are bouncing around more, which definitely effects comfort in digestion. As an example, thanks to my wonderful stomach, I plan to take in at least 400kcal/hr during my 3 hour high-intensity (lots of climbing) cycling race in a few weeks. I am in the final stages of testing my homemade Gels.


My ride today was broken into 3 parts:


  1. 70mins easy w/ a couple moderate efforts (long ride into Portland)
  2. 65mins fairly hard for the Group Ride: many attacks/breakaway attempts with moderate effort when recovering    **One breakaway was 15mins long @ HR 173bpm (85%+ Max HR and thus well into "high intensity")
  3. 40mins easy ride home


Without further ado, I present to you my most recent long-winded concoction "Banana Honey Almond Butter Gel": The gel is designed as a mid-long distance gel at moderate intensity. The other gel I made for today was a 'high-octane' formula for the 1 hour hard effort I made during the group ride.
There is one "secret ingredient" in which I am in the Alpha stages of testing, Blackstrap Molasses (it passed today's test! Woohoo!). I was rummaging through the cabinet last night when I came across this beast! I have been desperately searching for a good, high-quality, and natural source of potassium in compact form - I nearly resorted to using coconut meat from fresh coconuts (but didn't know if it is even high in potassium):
  • 1/2 Large Banana
  • 1/4 C Honey
  • 2T Almond Butter (homemade)
  • 1T Blackstrap Molasses
  • 2tsp Carob Powder
  • 1/4tsp Sea Salt
Place all ingredients into a food processor until smooth. Then turn back on for about 30 seconds (you want this stuff very smooth if you are using a Gel Flask - especially if you use dates or similar non-soft fruit at all!).


Here's a couple pictures of the good stuff in life: Pure, unadultered deliciousness that will burn cleaner (and cost much less) than anything commercially available. In due time, many of my recipes will have an estimated cost associated with them. A quick calculation gives this blend at about $0.33/oz (versus GU's base price of $1.25, their Roctane is a whopping $2.35). Even being an employee at a running store, I can't get nutrition for anything near $0.33/oz (unless it is expired and thus free :p):


The Mixology


Double-Flasking (6oz each) for the SMR on 3/24/2012 (3hrs cycling). 1000kcal total. (Left flask is the recipe shown above - my brother liked this one more).
The official breakdown of the two flasks:
Cal: 987, From Fat: 180. Carbs 186g (76% Cals), Fat 20g (18% Cals), Protein 17g (6% Cals). Now, a couple scientific papers (referenced in Thirve) state the body utilizes a 60:35:5 Carb:Fat:Protein ratio for moderate intensity and a 90:7:3 ratio for high intensity. As my workout included


Soon, once I've experimented a bit more, I will post my various formulae for homemade Gel for different activity intensities and lengths. Luckily my official "test ride" will be Tour of the Battenkill, a crushing 100K (62.25mi) justly dubbed "America's Queen of Classics". The spring race that has 10 dirt sections, 6300ft+/- vertical gain/loss, and will make you suffer whether you are a pro or if it's your first voyage on the epic route. There are bouts of absolutely maximal efforts and a lack of pleasing lulls in this race, thus it is very difficult to prepare for nutritionally. Best thing (as with any day training or in life): Make sure the fuel stores are completely full. Next step, take in what you can and make sure your body burns cleaner, better, faster, stronger.


Until my next Gel post, enjoy trying out this recipe. If you want suggestions or have any questions post them in the comments and I will more than gladly respond to you!

Friday, March 23, 2012

First Recipe: Black Bean Brownies: Take One (definitely doing these again!)

I was initially going to do a post about my new-found amazingness: Home Made Energy Gel. But due to special request, I will be writing about the easily confused with dessert specialty infamously known as the deceitful "Black Bean Brownie" (BBB). There are hundreds of recipes out there, it is not a bit crazy - just pure awesome. Every health blog that likes flavor (and thus is worth it's memory in cyberspace) must have a BBB post. So maybe it is fitting that this is my first recipe post (thanks Al and Ronni!). Out of all the blogs that have BBB options there is one above the rest: No Meat Athlete (which will be referred to as NMA from here on) has the "Ultimate Energy Bar Formula". I've never been one to really like following a strict, specified recipe. If I do, it is to get the basics down if the recipe seems complex. I simply prefer going rogue! This basic formula lets you do whatever the heck you want and, often more importantly, is very nice when you don't live within a health market's pantry. Ever run into the problem where you see a 'critical ingredient' on a recipe and it is the first time you have ever seen that item? (Ex: I don't have brown rice flour, quinoa flakes, hemp oil, the list goes on and on). Well, with NMA's guide you can't miss.

This time, I'll give the eye candy before the recipe...but don't get too used to it!

Okay, so these are pictures of the second set of BBB I made with CC's (chocolate chips). Sadly I didn't snap a photo of the first set...I was too excited to eat them and give them away.

So I took a stab at it. And I've taken another stab since then (to make more dessert-like BBB's). Here's what I came up with on try #1:

  • 1 Can (15.5oz) Goya Black Beans - drained, then rinsed a couple times to get the chunky stuff out. Don't worry about completely draining the excess water after rinsing!
  • ½ C Homemade Almond Butter
  • ¼ C Agave Nectar
  • ½ Large Banana (makes  ¼ C mashed banana)
  • ½ Cup Cocoa (I had Hershey's 100% Special Dark)
All components below are put in after you hit the first set with the food processor until fully smooth. Make sure to not pulverize the oats and especially to keep the raisins intact as best as you can!
  • 1½ C Rolled Oats (Use the thick cut or regular - quick oats will likely become mush)
  • ½ C Whole Wheat Flour (subbed for the preferred brown rice flour which I don't have)
  • ⅓ C Raisins
  • ⅓ C Shredded Coconut (I only had sweetened - I would preferably use unsweetened)
  • ⅓ C Dark Chocolate Yogurt Covered Raisins (not really optimal by being 'natural', but they looked so good - and made an awesome textural & flavorful addition)
Extra notes: If things seem super thick and very hard to sculpt, feel free to add a bit of water 1-2T at a time. This step will differ based on what types of binder, flour, and sweetener you use.

Put in an 8x8 (bigger brownies) or 9x13 (more brownies) pan that has cooking spray on it. Bake on 350F for 12-18 minutes...all you need to do is firm up the mixture and get a touch of the water out, no big chemistry is happening here - but it definitely adds a lot to the completeness of the flavor and texture. If you try these with a no bake procedure I would suggest more of dry ingredients, but let me know if you give it a shot!

On this recipe, I went with the 8x8 Pyrex. Thus it made 12 pretty solid sized brownies (nutritional info is listed below). I prefer the 9x13 method, it yields 20 still good size brownies. More is more! So, how did they come out?? To quote my brother: "These do NOT taste anything like 200 calories!" He was expecting 350+. I told him I didn't use any added sugar or chocolate (cocoa powder is different) and they had zero butter. Needless to say, he was pleased and impressed.

Now for the nutrition breakdown. Did you think I'd actually go without it?! If you did, get used to knowing every little thing about my cooking. I have created a streamlined Excel template/workbook and food database, so it is very quick and easy. I include both 2000kcal and 3500kcal diet values (as my intake is far closer to 3500kcal or above, rather than 2000kcal). No gram scale...yet, so I can't be uber precise. Here it is (and If you do a 1/20th batch per the 9x13 pan...then each brownie is a mere 60% of this recipe...or 126kcal. Now that is absurb :) )


They turned out great. Unless you have an extremely keen palate, you wouldn't even notice that the base is black beans without being informed of it. Whether you are someone who likes to make healthful snacks or not, these are a must try!

Wednesday, March 21, 2012

The Mid-Night Baker Goes Global

Welcome to the Mid-Night Baker (MNB) Blog! I was quite bummed to see that a lot of other people had created blogs called 'Midnight Baker' in some way or another, but I was 100% set on naming it this. Why, you ask?

Story time! Because about 8 years ago, when I embarked on my first ever quest of baking I did it really late one night - probably a school night when I had more 'important' (ha!) things to do. The cookies turned out amazing. The name wasn't created then but, being the night owl that I was, I would always do my baking super late...sometimes starting around 1AM. Why? Because I LOVE COOKIES. And when I want cookies, I eat cookies. And if I don't have good cookies (read: "homemade delicious cookies"), I make said homemade delicious cookies. So I started a trend for myself. I continued to play around with a variety of recipes. My sister would plead for me to bake them for her hockey team. I'd make a huge batch (80+ cookies) and they would be gone in a few days. Supply was low, demand got high. And the process continued until the Kroot household weight had increased by a few percentage points, and the vicious cycle was ceased...temporarily...until the beast was once again awoken. That beast, as dubbed by my Mom, was jokingly named "The Mid-Night Baker". Clearly, the name stuck. I was no loch-ness monster, but the cookies inspired monster-like tendencies of indulgence and sheer lack of control.

The Mid-Night Baker Logo!
As Seen on the MNB Basic Roasted Almond Buttah Label
Over my college years, cookies became less and less common - often gracing their presence over the holidays for larger gatherings and whenever I really wanted some cookies (or the demand hit critical mass). One of the best Christmas presents I ever received was an Ice Cream Maker. I was literally going Nintendo 64 crazy circa 1996 - and, yes, I looked up the released date for an accurate statement right there. For those 'non-gamers' I'll go with Tickle Me Elmo, also released in 1996 (note: Wikipedia rocks!). I would have nights where I was both baking cookies (which sometimes was dubbed "cooking bakies" in absolute tiredness and goofiness) and making ice cream. The Mid-Night Baker's Cookiewich became instantaneous glory. I kid you not. It was epic - and this is not abuse of the word epic. Trust me. Then I got the brilliant idea to simply combine my delicious ice cream and well-loved cookies. How, you ask? Cookie Dough Ice Cream. Yes, I went there. Yes, the cookie dough was uncooked. And, yes, it was complete glory. It may even be known as my first Pursuit of Glory. My Dad - a food lover - said, at the time, "This is the best ice cream I have ever had!" I told him he was being absurd, but he assured me he 100% meant it. That was when I knew I had nailed it. Complete, top of the list, approval from Brian Kroot. The Mid-Night Baker was legit. The MNB is legit, at least in my mind thanks to my Dad's full-on approval. However, I'll keep the verdict out for you all.

With my recent resurgence in cooking and baking and new endeavor of raw recipe making, a food blog is in order. The Pursuit of Glory has a perfect counterpart now: FOOD! And, today, the Mid-Night Baker  is going to la-blog. la-blog backwards is Global. Coincidence? I. Think. Not.

The Kitchen Frenzy upon discovery of a (very old and very AWESOME) Food Processor,
which has become my new, very dear friend.
Recipe #1: Happiness from your food:
Ingredients list:

  • Know exactly what you are putting into your body...and why (much more challenging than one would think!)
  • Eat for recovery, eat to be constantly and optimally fueled
  • Flavor. For the most part...if you don't enjoy it, you won't eat it (or at least not often)
  • Balanced
  • Keep the fat healthy!
  • Result in: "No way is that good for you!"
  • Convert people to believe experience that tasty food = healthful food
  • Minimize (or neglect): Butter, cream, sat fat, added oils, sugar, non-whole grains, etc.
  • Maximize: Complete nutrition, pureness of flavor, ability to taste most (or all) components

Process:

  • Combine ingredients
  • Enjoy
  • Be Happy :)

Note: The MNB will be in association with my other blog: The Pursuit of Glory - which highlights my athletic and life endeavors. Expect a (very) high focus on high-quality, high-octane recipes to fuel the athlete looking for optimal performance. However, I will (every Blue Moon or two) include an 'unhealthy' or 'less than optimal healthfulness' recipe with a specific label that is TBD.